Ruby’s call data automatically syncs into Clio Grow, prepopulating the Quick Intake form with details like name, phone, and caller notes.
Ruby can integrate with your Clio Manage account too! Click here to learn more.
For HIPAA Compliant Customers: This integration does not meet the necessary communication security requirements for Protected Health Information, and therefore should not be used in conjunction with HIPAA compliant Ruby service.
Begin Setup
STEP 1: Log in to your Clio Grow account and navigate to Settings > Integrations.
STEP 2: Scroll down to Lead Capture. Find your Lead Capture Token and click Copy.
STEP 3: To add the token to your Ruby account, log in at my.call-ruby.com.
STEP 4: Navigate to Account and then Integrations.
STEP 5: On the Integrations page, click “Add New” and choose Clio Grow from the list of Integration options section, and click Setup.
STEP 6: Click on the meatball menu and select “Enable Automatic Transfers”. This will set up all incoming call activity to flow to Clio Grow.
Prefer To Only Have Some Messages Sent To Clio Grow?
STEP 1: Left click the meatball menu and Disable Automatic Transfers.
STEP 2: Click again and select “Modify Rules”.
STEP 3: Click Add.
STEP 4: Under Rule Type click Profiles
STEP 5: Under Select Profiles select any profile whose messages you would like to see in Clio Grow.
STEP 6: Click Save.

Your Clio Grow Lead Inbox
When a new call handled by Ruby comes in, you will get a notification on your Clio Grow lead inbox. Each new call from Ruby will show the name of the caller (if available), and their phone number at the top of the message. The Source will display as “A call handled by Ruby” number at the top of the message.

If you’ve set up your Ruby account so that receptionists gather caller’s email and how they heard about your business, these gather fields will populate in the Clio Grow fields for email and source respectively. The message area will display additional call data including the caller ID, the duration of the call, and the time the receptionist spent on the call. Lastly, any actions resulting from the call, such as the receptionist taking a message or the caller being sent to voicemail, are included at the end of the inbox message.
Adding Contacts
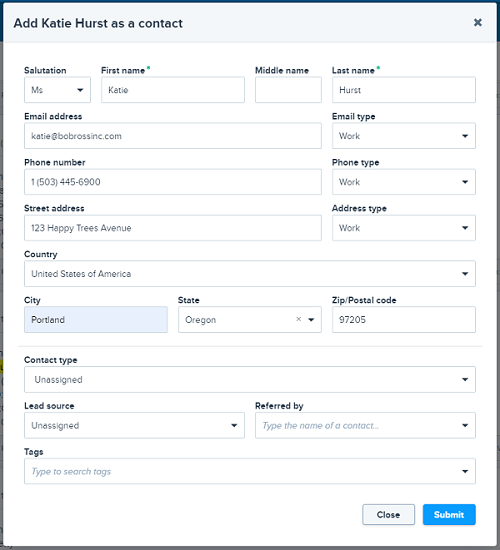
From each message, you can easily add the caller as a contact. Simply click the blue Add button and then Add Contact. The form will prepopulate with the caller’s name and number. The message will display in the Note Body area of the form.
From there it’s easy to select the lead status and add or edit the source to create your new contact. If you’ve asked Ruby to collect an email or how heard from your caller, this information will display in the corresponding Clio Grow form fields.

Using the Quick Intake Form
As with contacts, you can easily add callers as leads using the Quick Intake form. In addition to the information that will automatically fill from the Ruby message, you will have the opportunity to add additional information, such as matter details and estimate value.
Simply scroll the Matter Note field to the message section to reference the full Ruby message at any time.